Gluteus Maximus Stretch

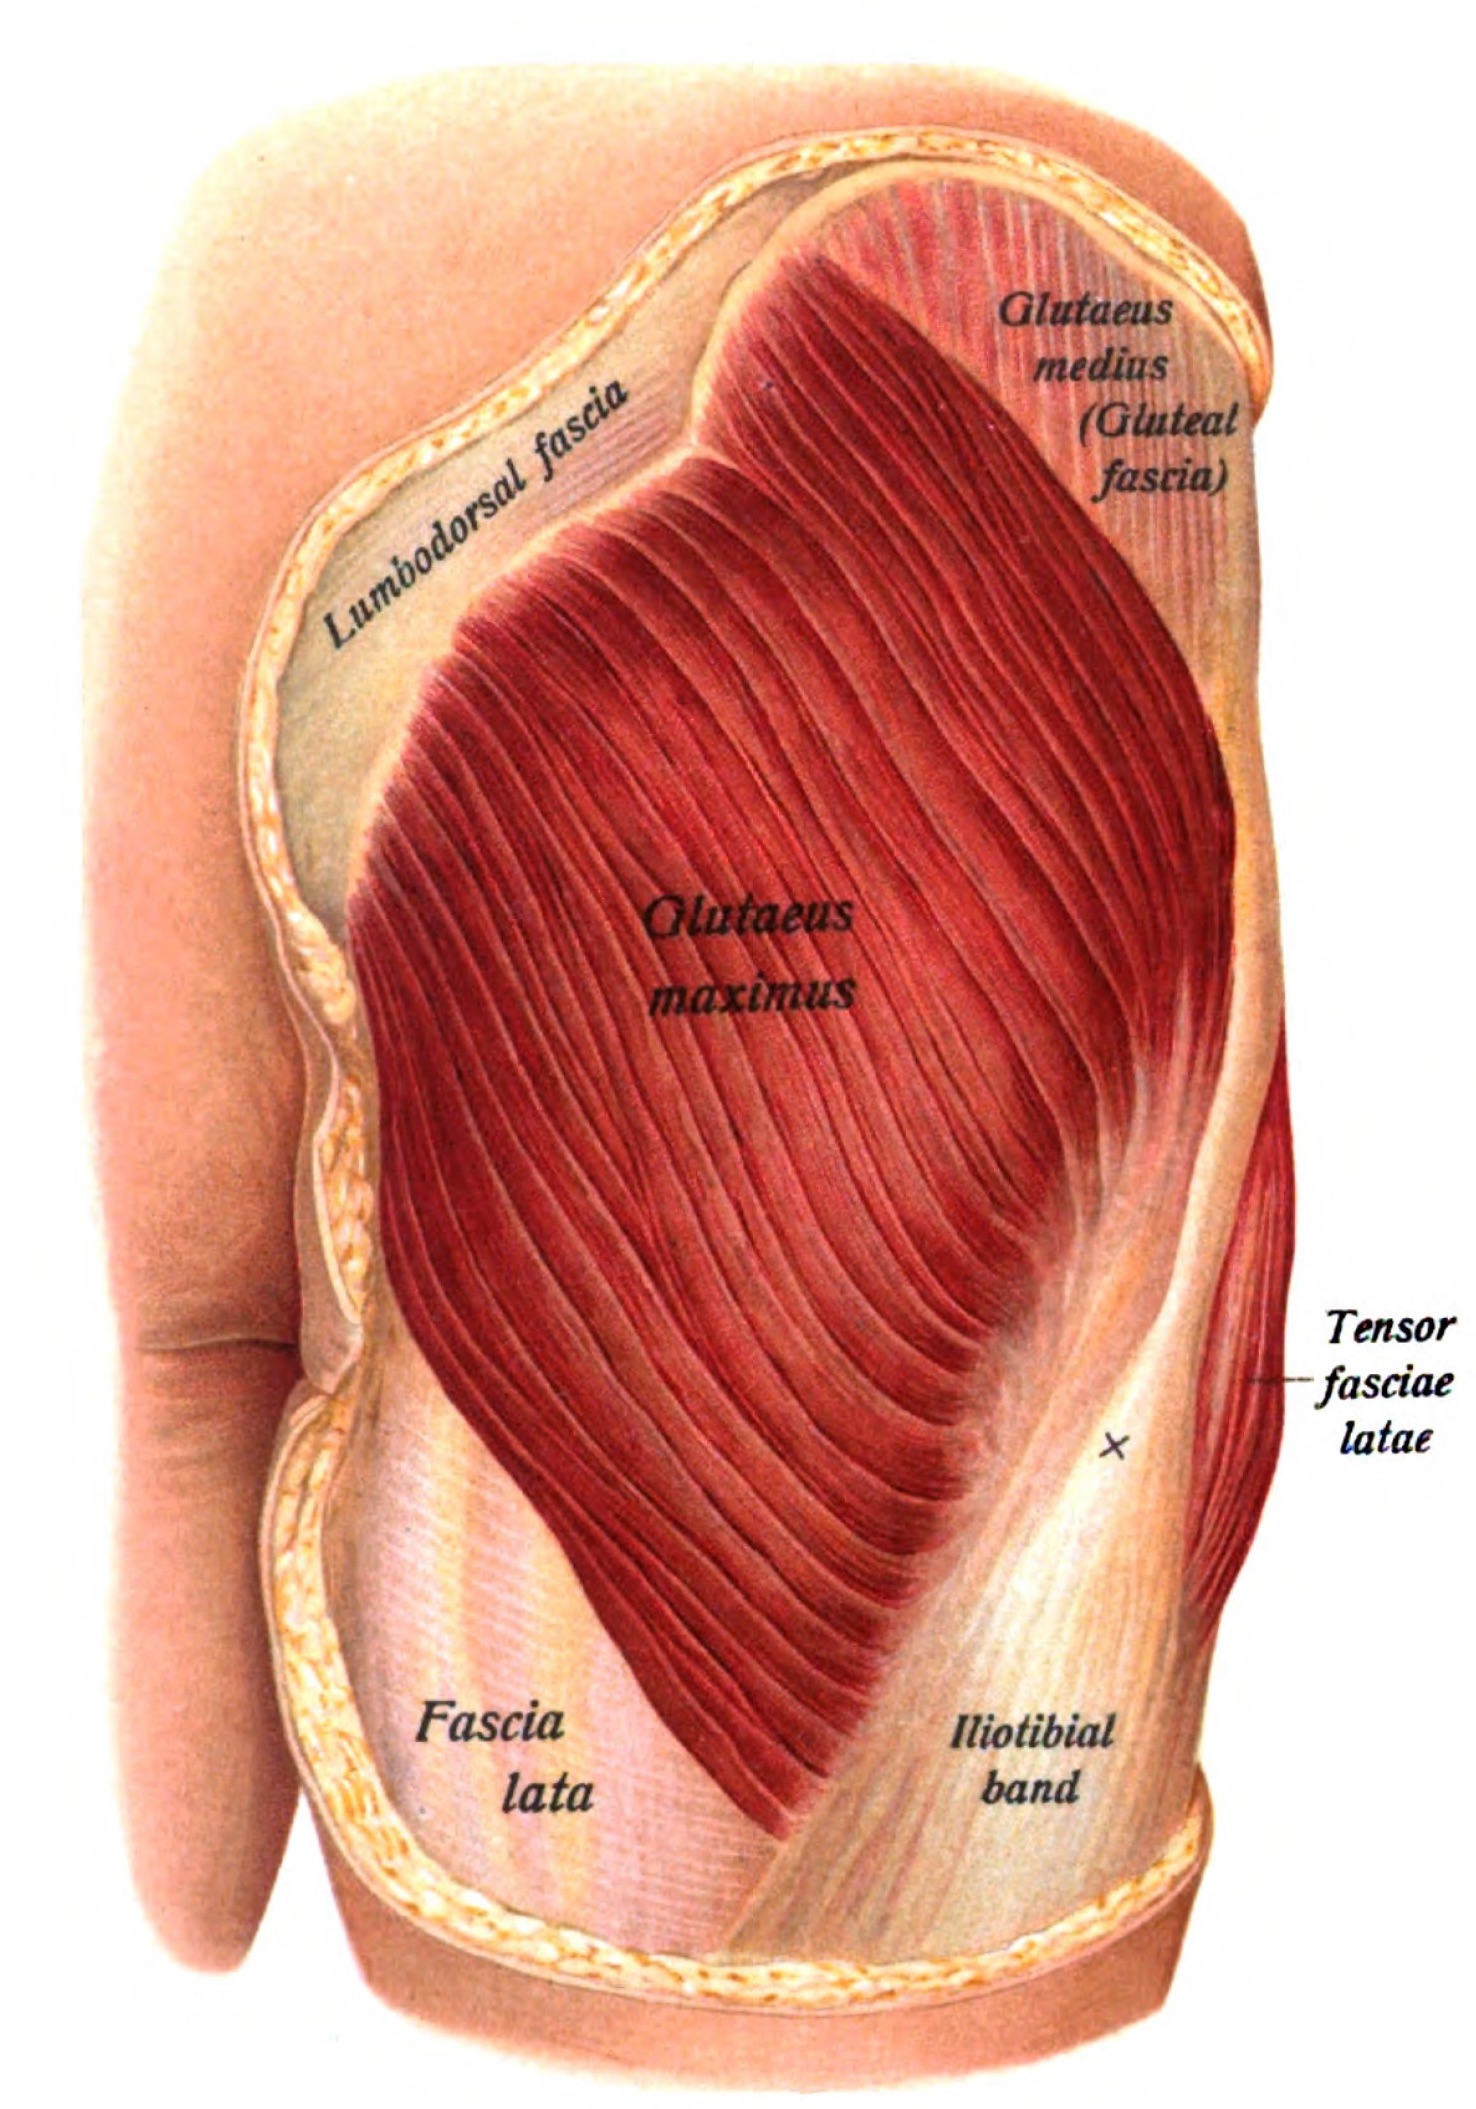
Glute max, largest of the “butt muscles,” is a powerful extensor of the hip, attaching to the sacrum and iliac crest at one end, and the femur and IT band at the other. It works hard and can develop trigger points. Its attachments also cross the SI joint, so glute max tension can result in pain or reduced movement at the base of the spine.

Gluteus Maximus:

Gluteus Maximus Muscle1

Guidelines for stretching:

  • Stretch on the exhale.
  • If you feel pain, back off a little.
  • Hold the stretch for 4-10 breaths, or until you feel the resistance soften.
  • 3 times each side is considered ideal, but if you’re short on time then some is better than none.

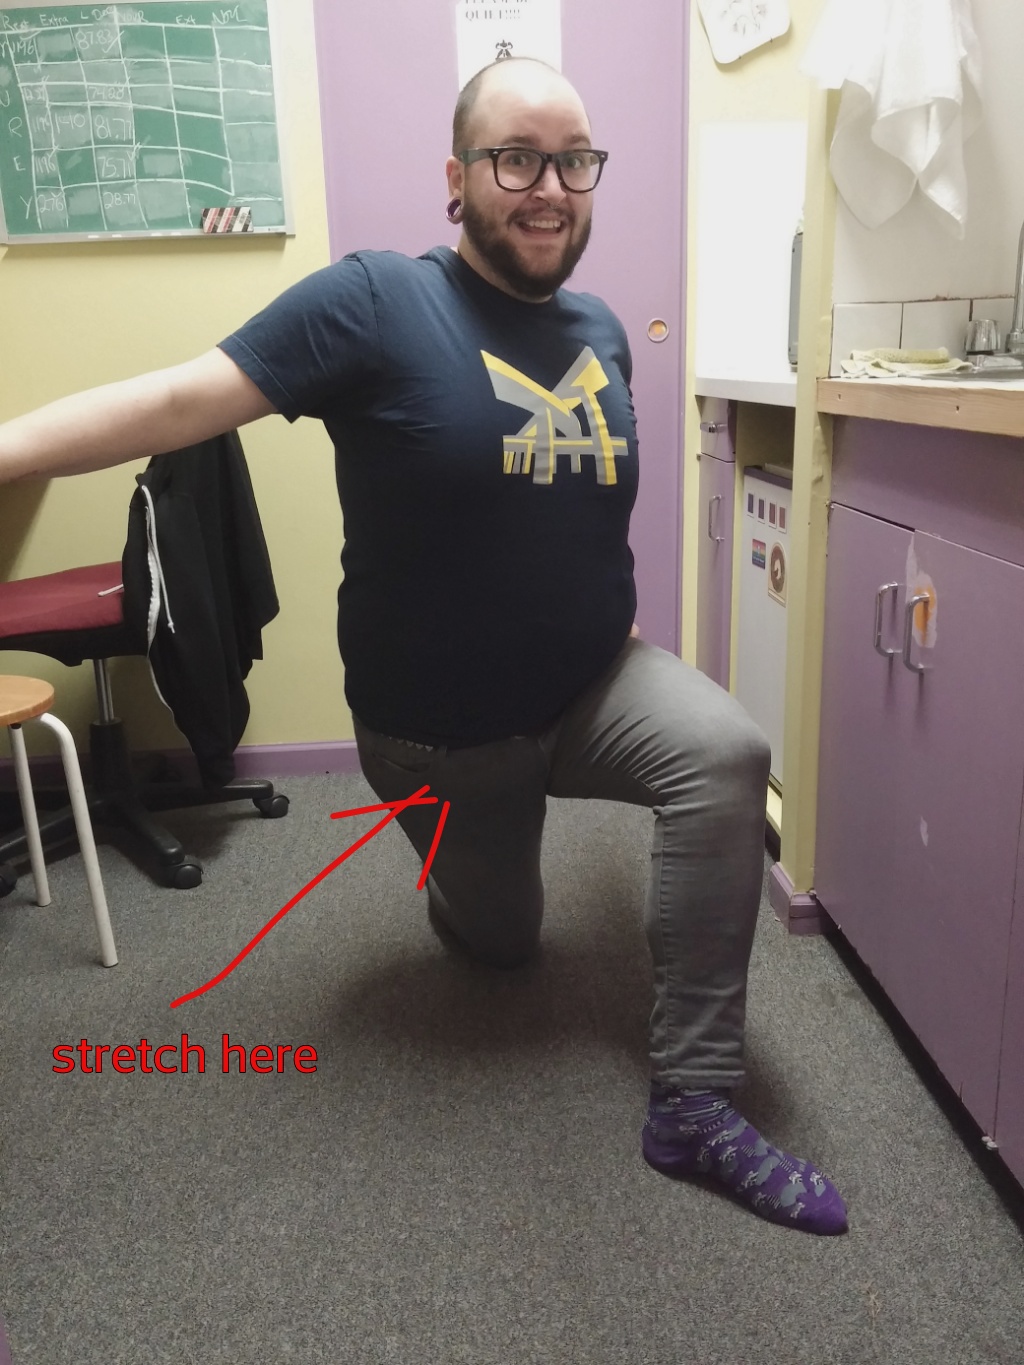
For your hip and buttock (gluteus maximus muscle):

  1. Lie on your back.
  2. Pull one knee up to the opposite shoulder.
  3. Slide one hand down to your ankle.
  4. Pull the knee and ankle evenly across your body to the opposite shoulder.
  5. Feel the stretch across the buttock, from the sacrum to the thigh.

Happy stretching! Let me know if I can help with anything.


References:

1. “Sobo 1909 294” by Dr. Johannes Sobotta – Sobotta’s Atlas and Text-book of Human Anatomy 1909. Licensed under Public Domain via Wikimedia Commons – http://commons.wikimedia.org/wiki/File:Sobo_1909_294.png#/media/File:Sobo_1909_294.png


© William Wells 2015

Kneeling TFL Stretch

Here’s a stretch for the tensor fascia latae (TFL) muscle. It’s a hip flexor that runs from the point of the hip diagonally down to the IT band. Because of its location, it can be difficult to isolate.

Tensor Fascia Latae

Tensor Fascia Latae. Image created by Beth ohara (Own work) [GFDL (http://www.gnu.org/copyleft/fdl.html) or CC-BY-SA-3.0 (http://creativecommons.org/licenses/by-sa/3.0/)%5D, via Wikimedia Commons

Stretch on the exhale. When you’re stretching, if you feel pain then back off a little.Hold the stretch for 4-10 breaths, or until you feel the resistance soften. 3 times each side is considered ideal, but if you’re short on time then some is better than none.

  1. Kneel on a pillow on one knee, with the other leg in front of you at 90˚. It helps to have a sofa, chair seat or other support to lean on.
    Kneel on one knee
  2. Bring your front foot across past your back knee, and shift your hips over so that your back leg is on an angle.
    Shift your front foot over
  3. Tuck your tailbone and lean forward through your hips. Feel the stretch in the front of your back leg.

I got this exercise from this video from Upright Health:

Happy stretching! If you contact me, I’m happy to answer any questions you might have.


© William Wells 2015

Unhunch Those Shoulders: a Pec Minor Stretch

Do you feel like you’re always leaning forward or hunching over a computer? Chances are, your pectoralis minor muscles are short and tight. Here’s a stretch you can do in a couple of minutes during your work day to provide relief and reduce tension.

Pec minor runs from the coracoid process, a forward projection of the scapula (shoulderblade), down to upper ribs. It pull the scapula down and forward, and raises the ribs when your breathe in deeply. When it’s short, it causes the bottom of the scapula to wing out, and puts strain on the serratus anterior muscle, leading to trigger points and pain over the lower ribs and side. Releasing pec minor can lead to easier breathing and a feeling of increased openness through the chest.

Here’s a picture:

Pectoralis Minor Muscle

Image via Wikimedia Commons, licensed under the Creative Commons Attribution-Share Alike 2.1 Japan license. Original poster Was a bee. Created: September 10, 2012

As a guideline, stretch on the exhale. If you feel pain, back off a little. Hold the stretch for 4-10 breaths, or until you feel the resistance soften. 3 times is considered ideal, but if you’re short on time then some is better than none.

  1. For the front of your shoulders (pectoralis minor – the muscle that hunches your shoulders when you sit at a computer):
  2. Clasp your hands behind your back, keeping your arms straight and your hands next to your body.
  3. Tuck your tailbone and engage your core. (If you make an “sss” noise as you exhale, you should feel your core muscles engage under your ribcage.)
  4. Pull your shoulder blades together.
  5. Keeping your shoulders together, your core engaged and your back straight, push your arms straight down towards the floor.
  6. You should feel the stretch in the upper part of your chest.

I hope that helps. Drop me a line if you have questions. Have a great week!

© William Wells 2015.

Supine Hip Flexor Stretch

I’m always on the lookout for new ways to stretch the hip flexor muscles: rectus femoris and the iliopsoas group. I found this video and tried it out, and I like it a lot. “Supine,” means, “Lying on your back.”

Remember, with stretching, if you feel pain, back off a little; definitely avoid anything that causes sharp or stabbing pain. Hold the stretch for 4-10 breaths, or until you feel the resistance soften. 3 times each side is considered ideal, but if you’re short on time then some is better than none.

Here’s the original video. You can substitute a couple of pillows or a bolster for the foam roller.

Here’s the instructions I put together after trying it:

Supine hip flexor stretch:
1. Lie on your back on a firm surface like a yoga mat.
2. Draw your knees up as far as you can while keeping your feet on the mat.
3. Lift your pelvis off the mat in a “bridge” pose.
4. Slide a bolster, a foam roller or a couple of pillows under your sacrum.
5. Pull your knees up to your chest.
6. Holding one knee to keep your tailbone rolled up, slowly let the other leg down to the floor.
7. Feel the stretch in the front of your hip and thigh, and in your lower abdomen.
8. Experiment to find what gives you the best stretch. You can play around with lifting your lower leg or letting it rest on the floor. You can also engage your hip flexors for a few seconds by raising your whole leg, then relax back into the stretch. Alternatively, extend your leg through the heel or toes. Try rocking your pelvis up and down, and side to side.
** When you switch sides, do so by bringing both knees up, then letting the other leg down; this avoids overstraining the low back. **

Have fun, and please contact me if you have any questions.

© William Wells 2015.

Neck stretches 4: the Upper Traps

The trapezius muscle is one of the big stars of the musculoskeletal world; who hasn’t heard of the traps? It’s understandable. The traps (upper, middle and lower) cover about a third of the back and do a wide range of tasks. Trapezius is a postural muscle, which means that it’s always working to keep you upright. It pulls your shoulders back and down, and your head back, so it’s constantly contracting to counter slouchy shoulders and head-forward posture. Constant contraction in an overstretched position leads to trigger points, aching and pain in the back of the neck.

Trapezius Muscle

Trapezius muscle. Image via Wikimedia Commons. Originally posted by Mikael Häggström.

Today we’re focusing on the upper traps. When somebody grabs the bundle of muscle to either side of your neck, that’s upper traps on top.

Upper Trapezius Muscle

If you feel pain when you’re stretching, back off a little. Hold the stretch for 4-10 breaths, or until you feel the resistance soften. 3 times each side is considered ideal, but if you’re short on time then some is better than none. Try alternating with stretching the levator scapulae, SCM and scalenes.

  1. Pin your shoulder down on the side to be stretched. Grab your elbow with the opposite hand, or sit in a chair and grab the seat.
    Neck stretch shoulder pin
  2. Bring your ear to the shoulder opposite the side to be stretched.
    Neck stretch: sidebend
  3. Turn your face up to the ceiling, towards the side to be stretched.
    Neck stretch: sidebend and rotate
  4. Gently tip your head down towards the floor, while maintaining side flexion and rotation.
    Upper traps stretch: tip forward
  5. Find a combination of these three movements that creates stretch up the side and back of your neck.

Make sense? Got questions? Send me a message and I’d be happy to help you out.

Once again, thanks to the ever-amazing Ray Ranger, RMT from Trikinetic Massage Therapy for posing.

© William Wells 2015.

Neck Stretches 3: the Scalenes

Your scalenes (there’s 3 of them) are moderately deep muscles in the front of the neck; they’re mostly covered by the much larger sterno-cleidomastoid (SCM), but even though they’re small, they can be a big source of trouble. In fact, because they’re so delicate, they’re highly prone to trigger points.They have a referral pattern of pain that radiates over the front or back of the shoulder, and down the arm to the hand, especially on the thumb side.

The scalene muscles run from the sides of your vertebrae to your first two ribs, and pull the ribs up when you breathe deeply. They also tend to pull your head down and forward when they’re tight, contributing to head-forward posture and pain in the back of the neck.

Scalene Muscles

Anterior, middle and posterior scalenes. Image courtesy Wikimedia Commons: Original uploader was Mikael Häggström at en.wikipedia

Here, then, is a stretch to isolate the scalenes, especially the anterior (front) and middle scalene. You can do this stretch as many times a day as you like. It’s good in combination with stretches for the levator scapulae, SCM and upper traps.

If you feel pain when you’re stretching, back off a little. Hold the stretch for 4-10 breaths, or until you feel the resistance soften. 3 times each side is considered ideal, but if you’re short on time then some is better than none.

  1. For this neck stretch, pin by placing your hand just below your collarbone, so that it pushes down on the first two ribs.
    Scalene stretch: pin
  2. Tuck your chin.
    Scalene stretch: chin tuck
  3. Keeping your chin tucked, tip your neck back. This likely feels awkward, but this step is key.
    Scalene stretch: tip the neck back
  4. Still keeping the chin tucked and neck back, bring your ear to the shoulder opposite the side being stretched.
    Scalene stretch: sidebend the neck
  5. Turn your face up to the ceiling, towards the side being stretched.
    Scalene stretch: rotate the head
  6. Play around with a combination of these movements until you feel the stretch in the front and side of your neck.

Thanks to my Trikinetic colleague Ray Ranger for modelling the photos.

© William Wells 2015.

Stretch Your Neck Part 2: Lev Scap

Last week I posted about stretching your SCM, in the front of your neck, to ease the tension created by head forward posture. Today I’d like to show you a stretch for your levator scapulae muscle, also known as “lev scap” or just “levator,” which runs from the side of your neck down to the top of your shoulderblade, like this:

Levator Scapulae muscle

Levator scapulae muscle, image courtesy of Wikimedia commons.

This muscle is one of the most common direct causes of neck pain. When it’s tight and short, it gives you that feeling of wearing your shoulders like earrings. It can also refer pain down between your shoulderblades. Stretching it out can bring immediate relief, although I recommend doing it in combination with the SCM stretch to balance the front and back of the neck.

Thanks again to my Trikinetic colleague, Ray Ranger RMT, for posing for the pictures.

Guidelines for stretching:

  • Make sure you’re in a stable, comfortable position.
  • Stretch on the exhale.
  • If you feel pain, back off a little.
  • Hold the stretch for 4-10 breaths, or until you feel the resistance soften.
  • 3 times each side is considered ideal, but if you’re short on time then some is better than none.

To stretch levator scapulae:

  1. Pin your shoulder on the side to be stretched – sit on a chair and hold the seat, or reach behind and grab your elbow with your other hand.
    Neck stretch shoulder pin
  2. Bring your ear to the shoulder opposite the side to be stretched.
    Neck stretch sidebend
  3. Turn your face down to the floor, away from the side to be stretched, and tip your head forward, as if you’re sniffing your armpit. 🙂
    Stretch Levator Scapulae
  4. Find a combination of these movements that creates stretch down the back of your neck.

And that’s all. I hope it helps. Let me know if you’ve got any questions!

© William Wells 2015.

Stretch Your Neck! Part 1: the SCM.

Here’s a stretch for your sterno-cleidomastoid (pronounced “ster-no cligh-doh mas-toid,” or SCM) muscle, which runs from behind your ear down to your collarbone. It’s big, powerful, and a major contributor to head-forward posture, which in turn leads to aches and pains in the back of the neck. This is the stretch I give most often to my patients, to counter the effects of sitting at a computer, driving a car, or anything that causes you to lean forward.

Thanks to my fabulous colleague at Trikinetic, Ray Ranger, RMT, for modelling the positions.

This is your SCM muscle:

SCM muscle

SCM muscle, image from Wikimedia Commons.

To stretch it, try to make your neck look like this:

SCM stretch

Let’s break that down. First of all, some guidelines for stretching:

  • Make sure you’re in a stable, comfortable position.
  • Stretch on the exhale.
  • If you feel pain, back off a little.
  • Hold the stretch for 4-10 breaths, or until you feel the resistance soften.
  • 3 times each side is considered ideal, but if you’re short on time then some is better than none.

SCM stretch:

  1. Pin your shoulder on the side to be stretched – sit on a chair and hold the seat, or reach behind and grab your elbow with your other hand.Neck stretch shoulder pin
  2. Sidebend your head and neck away from the side you’re stretching.Neck stretch sidebend
  3. Turn your face up, towards the side you’re stretching.Neck stretch sidebend and rotate
  4. Maintaining side flexion and rotation, tip your head and neck back.SCM stretch neck position
  5. Play around with the three movements until you feel the stretch in the side and front of your neck.

Got questions? Please ask me! I’m here to help.


© William Wells 2015.

Refresh and revitalise with a contrast arm bath

Do you type or use a mouse a lot? How about a game controller? Do you get pain or feelings of tightness in your forearms, wrists or hands? How about signs of inflammation: heat, redness or swelling?

Try a contrast arm bath to refresh, renew and revitalise your tissue:

  1. Fill two tubs or sinks, large enough to submerge your forearms, one with warm or hot water and the other with cool or cold. **Be careful: if the difference in temperature is too great, you can burn your skin even if the actual temperature of the water isn’t that extreme.**
  2. Submerge your forearms in the warm water for 3 minutes, then in the cool water for 1 minute. Going from warm to cold can be shocking, so be warned.
  3. Repeat 3 times. You can stay in either side longer or do more repetitions if you like, but finish in the cool water.
Sinks for contrast arm bath

Sinks for a contrast arm bath.

As a massage therapist, this is something I do on a regular basis to counteract the effects of working with my hands all day.

Here’s how it works:

  • Heat draws fresh blood to the area, bringing fresh nutrients. Heat also softens and relaxes the muscles and connective tissue (tendons and ligaments).
  • Cool and cold applications cause the blood vessels to constrict, flushing away metabolic waste products.
  • The repeated contrast has a pumping action that’s really good for the tissue and helps reduce inflammation.

Try following your contrast bath with forearm stretches – more on those another time. You can also do a contrast foot bath, for the end of those long days.

If you have any questions, comment here, or send me a message. I’d love to help!